Description
Import Spreadsheets from Microsoft Excel is a WordPress plugin that allows you to import live, calculating spreadsheets from Microsoft Excel to your blog or website in WordPress. The plugin is free but the calculating web page must have been generated with a paid license for SpreadsheetConverter, an add-in for Excel that converts the Excel spreadsheet to HTML and the formulas in Excel to JavaScript. The uploaded online spreadsheet is live and looks and feels exactly like in Excel. Now you can use Excel everywhere!
SpreadsheetConverter works like an Excel compiler creating live online spreadsheets in HTML and JavaScript. It is not a simple Excel viewer; the web spreadsheet plugin runs all your formulas in real-time – all the cells and charts are live!
You usually need to have your own WordPress server to install plugins. It may not be possible to install plugins on WordPress.com or other shared WordPress servers. If you are unable to use this plugin, you can use our Publish to Cloud service instead. It is built into SpreadsheetConverter and uploads the calculator to a cloud server. In most cases, this works just as well.
Note: before you upload a spreadsheet, you must use the SpreadsheetConverter add-in for Microsoft Excel to convert your spreadsheet to web format. To use this add-in, you must have Microsoft Excel 2007 or later for Windows – and the basic skills to create spreadsheets with it. Prices for unlimited, lifetime licenses for the current version start at $254. There are no extra fees per server, month, page or visitor.
We’d love to help you try SpreadsheetConverter on one of your own spreadsheets. You don’t have to install the software to test it. Just send one of your own spreadsheets, and we’ll send it back as a live, intelligent web form or calculator. Use the online form and remember to attach the spreadsheet!
This service is free, because it’s so simple to convert your spreadsheet to web format with SpreadsheetConverter that we can do it in almost no time at all. If you want to keep your web calculator or form up-to-date without ever installing or learning the converter, you can have us do all the conversion work for you, forever, using the paid conversion service.
SpreadsheetConverter is an advanced product that may require some time to learn. If you don’t want to invest in this new skill set right now, you can test the plugin right now with example files in the plugin’s ZIP file – read more below.
Please don’t post negative reviews until you have at least read the FAQ. Even better: contact support for any difficulties you have; we will help you get started for free!
Insert a live spreadsheet in your blog with just a few clicks
Any Excel spreadsheet can be published on the web:
- Open the spreadsheet in Excel and click Convert on the SpreadsheetConverter toolbar to have the Excel converter create a web spreadsheet.
- Click WordPress Plugin on the SpreadsheetConverter toolbar to create an SSC Calculator file with everything you will need in WordPress.
- Use this plugin to upload the SSC Calculator file to WordPress.
- Embed the calculator or form into one or more of your posts or pages in WordPress.
- Click Publish in WordPress and your calculator goes live, online on the web!
Please visit the Embed a spreadsheet in WordPress, FAQ and Screenshots sections for more detailed instructions.
A full online help for the plugin is available on the SpreadsheetConverter website.
Create beautiful web apps
At last you can create online calculators for your website without the help of a programmer. All you need is Microsoft Excel. Help your visitors do a better job, and they will return to your website for more.
- Price calculation: Online pricing calculators help your customers get the total price including options, maintenance etc.
- Financial calculation: provide online mortgage calculators, interest calculation, loan calculators or online lease calculation.
- Calculators for government and counties: online income tax calculation, online social benefits, online payroll calculators.
- ROI: Use online return on investment calculation to better show the benefits of your product, or calculate internal rate of return (IRR).
- Technical and engineering calculators: online dimensioning tools, online HVAC calculations, load calculators, concrete calculation, torque calculation, area calculators, volume calculation, electrical calculation, power calculation.
- Health calculators: online body mass index calculator, online calorie calculation, online body fat calculator.
You can use any feature of Excel on the web, including formulas and functions, to validate data entry, select intelligent default values or show customized images or maps.
- Create mobile-friendly, responsive calculators that automatically adapt to different screen widths, portrait/landscape orientation etc.
- Embed xls files with smart table lookup in an unlimited number of background data tables.
- Use graphical widgets like buttons and sliders to make the calculator easier to use.
- Use advanced data validation including Excel’s Data Validation presets.
- Show live graphs that automatically update when values are changed.
- Upload spreadsheets to any standard web server.
- With Real-time Sync, two or more persons can collaborate on an advanced calculation in real-time.
- Fetch live data from corporate databases when run on Node.js servers.
- Build calculating web apps that can be started directly from the iPhone or Android Home screen – even when the phone is offline.
Our calculators are completely self-contained and do not require any additional plugins. There is nothing to install in your server or website except this plugin, and it is only used when you edit. You don’t need any programming skills and there is no change to configuration or settings.
Build smart web forms with automatic data validation
Publish your electronic forms on the web and have completed web forms sent directly to your inbox. If you get a lot of electronic forms for post-processing, have forms saved in a cloud database as they arrive.
- Website contact forms with quality assurance for all contact data including e-mail addresses, phone numbers and addresses.
- HTML order forms with automatic calculation of totals and weights.
- Web booking forms with built-in input data validation.
- Online purchase order forms with automatic assignment of cost center and accounts.
- Web surveys converted from xlsx files.
The tabular Excel worksheet makes it very easy to design easy-to-use forms. The web page inherits the formatting in Excel and supports the use of graphical themes.
You can use any feature of Excel, including formulas and functions, to validate data entry, select intelligent default values or show customized images or Google maps.
- Create mobile-friendly, responsive forms that automatically adapt to different screen widths, portrait/landscape orientation etc.
- To make it easier to understand a large form, split into two or more sections and let users navigate between the sections using tabs, next/previous buttons or sliding panels.
- Use graphical widgets like menus and calendars to make the form easier to use.
- Hide rows or complete sections of a form until you know they are applicable.
- Allow file attachments with submitted web forms.
- Form fields can be made mandatory. Use hidden fields to discretely include supplemental information in the form.
- With Real-time Sync, two or more persons can collaborate on a form in real-time.
- Fetch live data from corporate databases when run on Node.js servers.
- Build apps for mobile data entry that can submit smart forms directly from iPhone or Android devices – even when the phone is offline.
- Use live, interactive charts that invite users to point-and-click, and the charts automatically update when values are changed.
Our forms processing services are completely self-contained, and the only thing you need to provide is an e-mail address. There is nothing to install in your server or website except this plugin, and it is only used when you edit. You don’t need any programming skills and there is no change to configuration or settings.
Create simple sign-up lists and other shared forms
Want to bring people together for a football game, a beach party or a barbecue? The Real-Time Sync feature allows all the users of a web spreadsheet to share the same content. Just create a spreadsheet with column headings for the information you want from each participant, e.g. Name and Age. Publish the empty list on your blog with the Real-Time Sync feature enabled, and all the readers of your blog will see who has registered for the event.
More information
Learn more about the plugin in the full Online Help for the plugin.
Learn more about the SpreadsheetConverter add-in for Microsoft Excel on the SpreadsheetConverter web site.
Installation instructions
Requirements
To use the plugin, you need the following:
- A web page created with a paid or free-trial license for SpreadsheetConverter. The plugin does not import unconverted spreadsheets. An example file is delivered with the plugin.
- Your paid SpreadsheetConverter license must be for the Professional Edition.
- You must use the same major version of the plugin as your SpreadsheetConverter license is for.
- A WordPress server that allows you to install plugins and use iframes. If you use WordPress.com or other hosted environments that limit this, it’s usually just as easy to use Publish to Cloud instead.
- Your WordPress server must be running version 4.5 or later of WordPress. For security reasons, WordPress should always be updated to the latest stable version.
- The plugin supports PHP 5, PHP 7, and PHP 8.
- The plugin requires that the ZipArchive extension for PHP is installed and enabled.
- You will need the help of a WordPress Administrator or be one yourself to install and maintain the plugin. Unfortunately we are unable to support you with basic WordPress issues.
Test it with the example file!
To upload a spreadsheet to WordPress, you first convert it to web format with an add-in for Excel called SpreadsheetConverter. Excel and the add-in will be your primary tools when publishing spreadsheets on your website.
You should first test the plugin with the example files that come with it. If you like it, you can then install SpreadsheetConverter in Excel and learn how to convert your own spreadsheets for the web.
Install the plugin file directly from the WordPress plugin directory
- Login to the WordPress administration page for your server.
- Click on Plugins in the left-hand menu. If you cannot find this in the menu, contact your WordPress administrator.
- Click on Add New.
- Type import spreadsheets in the search box on the right-hand side, and navigate to the plugin Import Spreadsheets from Microsoft Excel.
- Click on Install Now for this plugin.
- Locate the new plugin in the list of installed plugins and click on Activate Plugin.
- The plugin is now installed and active. You should now see a new menu option Upload SSC Calculator in the left-hand menu.
Manually upload the plugin file to your WordPress server
- Login to the WordPress administration page for your server.
- Click on Plugins in the left-hand menu. If you cannot find this in the menu, contact your WordPress administrator.
- Click on Add New.
- Click on Upload Plugin on the Add Plugin page.
- Click on Choose File on the Add Plugin page.
- In the File Explorer window, select the plugin zip file and click Open.
- Click on Install Now on the Add Plugin page.
- Locate the new plugin in the list of installed plugins and click on Activate Plugin.
- The plugin is now installed and active. You should now see a new menu option Upload SSC Calculator in the left-hand menu. This is where you start when you want to upload a converted calculator to WordPress.
A full online help for the plugin is available on the SpreadsheetConverter website.
Unfortunately, we are unable to support you in normal day-to-day WordPress activities. If you have problems installing the plugin, begin by contacting your local WordPress Administrator or webmaster. If they find any errors in our plugin, they are welcome to report the error in the support forum for the plugin.
Uploading instruction
You upload the result of the conversion in SpreadsheetConverter to WordPress in the form of an SSC Calculator file. The SSC Calculator file contains everything that WordPress needs to run the calculator.
Uploading a new calculator
Follow these instructions only when you upload a new calculator for the first time. If you later want to update an existing calculator that you have already uploaded at least once to WordPress, there are separate instructions below.
Creating the SSC Calculator file
With the plugin, you get two example files, one that you will use for this initial upload and one for the update described below.
Uploading the SSC Calculator file
- In WordPress, locate the Upload SSC Calculator link in your WordPress menu. If you don’t see this link, please verify that you have installed the plugin correctly according to the instructions above.
- Click on Upload SSC Calculator, then Add New if you are about to upload a new calculator that you haven’t uploaded before.
- Enter a unique, descriptive name for this particular calculator in the Enter calculator name field. For the example file, you can use Weekly Time Card.
- Click on Choose Package and select the SSC Calculator file. The example file provided with the plugin is in the examples > 1-upload folder of the plugin ZIP. Locate the weekly-time-card.zip file, select it and press Open.
- Press the Publish button and the SSC Calculator file will be uploaded to WordPress. It will not be visible in any post or page until you embed it (read more below).
Embedding instructions
Before you embed a spreadsheet, you must follow the steps above to upload the SSC Calculator file to WordPress. Now, it’s time to embed the calculator in one or more web pages.
Using the Block editor
To insert a converted spreadsheet in WordPress using the Block editor:
- In WordPress, click on the Upload SSC Calculator link in the menu.
- In the list of calculators, locate the calculator you want to embed.
- In the column Calculator iframe, click on the Click to Copy button for the calculator you want to embed. This copies the complete embed code to the clipboard.
- Open the Block editor for the page or post where you want the uploaded calculator to appear.
- Click on the plus sign to insert a new block. Type “html” in the search box and select to insert a Custom HTML block.
- Move the Custom HTML block to the correct position on the page, either by dragging it or using the up/down arrows.
- Select the HTML view for the Custom HTML block.
- Paste the embed code HTML into the Custom HTML block with Ctrl+V or right mouseclick+Paste.
- Select the Preview view for the block.
- If you cannot see the entire calculator, or if scrollbars appear, or if there’s too much whitespace around the calculator, you may need to adjust the size of the iframe. Select the HTML view for the Custom HTML block, adjust the height and width parameters in the table id=”hasIframe” tag that represents the calculator, switching back and forth to the Preview tab until the calculator looks good. Don’t be afraid of leaving a considerable margin around the calculator.
- Save your changes by clicking Publish.
- If you want to use an uploaded calculator on more than one page, just repeat the above once for every page where you want it to appear.
Using the Classic editor
To insert a converted spreadsheet in WordPress using the Classic editor:
- Open the Classic editor for the page or post where you want the uploaded calculator to appear.
- Place the cursor at the right spot and click Embed SSC Calculator.
- In the list called Calculator Link, scroll to and select the calculator you want to embed.
- If necessary, modify the size of the calculator frame in the web page using the fields Iframe Width and Iframe Height. Click Insert Calculator.
- If you don’t see the calculator, only a set of HTML tags, click on the Visual tab for a preview of the page.
- If you cannot see the entire calculator, or if scrollbars appear, or if there’s too much whitespace around the calculator, you may need to adjust the size of the iframe. On the Visual tab, drag the handle to resize the calculator frame. For better control, switch to the Text tab, adjust the height and width parameters in the table id=”hasIframe” tag that represents the calculator, switching back and forth to the Visual tab until the calculator looks good. Don’t be afraid of leaving a considerable margin around the calculator.
- Save your changes by clicking Publish.
- If you want to use an uploaded calculator on more than one page, just repeat the above once for every page where you want it to appear.
A full online help for the plugin is available on the SpreadsheetConverter website.
Updating an existing calculator
If you want to update an existing calculator that you have already uploaded at least once to WordPress, follow these instructions.
Creating the SSC Calculator file
With the plugin, you get two example files, one that you used above for the initial upload and one that you can use now for the update.
Uploading the SSC Calculator file
- In WordPress, locate the Upload SSC Calculator link in your WordPress menu. If you don’t see this link, please verify that you have installed the plugin correctly.
- Click on Upload SSC Calculator in the WordPress menu, then All Calculators.
- Move the mouse cursor over the title of the calculator you want to update, so that its menu links appear. Click on the Edit link.
- Click Choose Package and select the updated SSC Calculator ZIP file in the examples > 2-update folder of the plugin ZIP.
- Press Update. The new version is uploaded and automatically used instead of the old one, in all pages and posts that you have already embedded it.
Caching may delay updates to your web pages
If an update to a calculator does not immediately appear on the web or in the preview in the plugin, it may be a result of caching, which is beyond our control. Caching typically introduces a delay of 1-48 hours in the publishing of new or updated web content. When you test static web content like uploaded calculators, you can try adding a fake “version” parameter to the link to the calculator:
https://example.com/calculator.html?version=1
When you update the calculator, just remember to change also the version number in the links to it, which should force the cache to fetch the updated content. Note: you only need the version parameter during testing, to verify that the update went through correctly. In your production environment, the updated version will be loaded slightly later as the cached copies of the previous version expire.
A full online help for the plugin is available on the SpreadsheetConverter website.
Deletion instructions
Using the Block editor
To remove a calculator that you previously embedded in page or post:
- Select the Custom HTML block that contains the embed code for the calculator.
- Open the block menu for the block and select Remove Block.
- Save your changes by clicking Publish.
Using the Classic editor
To remove a calculator that you previously embedded in page or post:
- Switch to the Text mode.
- Remove the entire “hasIframe” table, from the table id=”hasIframe” statement to the /table statement.
- Switch to the Visual mode to verify the result.
- Save your changes by clicking Publish.
A full online help for the plugin is available on the SpreadsheetConverter website.
I want to test this with my own spreadsheets!
To test the plugin with your own spreadsheets, you need to download the SpreadsheetConverter add-in for Excel and install it in your system. After the free trial, you will be required to purchase SpreadsheetConverter at prices starting from $254, including the WordPress plugin.
- Verify that you are using a PC with a supported version of Windows and Excel, as listed in the requirements on the download page. Our examples convert without issues also in Windows on ARM devices.
- Download the Excel add-in.
- Install the Excel add-in by running the installation file in a Windows PC.
- In Excel, open the “Weekly Time Card” example spreadsheet. If you open Excel from the installation wizard, this file opens automatically. Otherwise, use the Try Examples section of the SpreadsheetConverter ribbon in Excel to open the “Weekly Time Card” example.
- Click on the Start tab in the example spreadsheet. This starts a small wizard that will show you how to edit a spreadsheet and convert it to a web page. Follow the simple, step-by-step instructions in the example spreadsheet until you have successfully created a web version of it. If you run into any problems in this process, please contact our helpdesk.
- Congratulations! You have now created a live web calculator! Play with it a while in the browser window to get a feel for how it works and what it does.
- In Excel, select the SpreadsheetConverter ribbon and click on the link in the ribbon to request a 30-day free trial license key.
- When you get the license key from us, select the SpreadsheetConverter ribbon in Excel and activate the license key.
- In Excel, select the SpreadsheetConverter ribbon and verify that there is a WordPress plugin button in the Publish section. If not, please contact our helpdesk.
Now, you’re ready to upload the converted web page to WordPress according to the instructions above.
Screenshots

A car loan calculator in Excel can be downloaded as a web app. 
Create calculator package from ribbon Publish > WordPress plugin of SpreadsheetConverter Excel add-in. 
Login to your WordPress site and click 'Upload SSC Calculator'. 
Enter a name and browse the calculator package (zip). 
Click on Publish. 
Go to any post or page then click on 'Embed SSC calculator' button just above the kitchen sink. 
Select the calculator package name from dropdown list. 
Click on 'Insert Calculator'. 
Adjust the size by dragging on the resize handle on the corners. 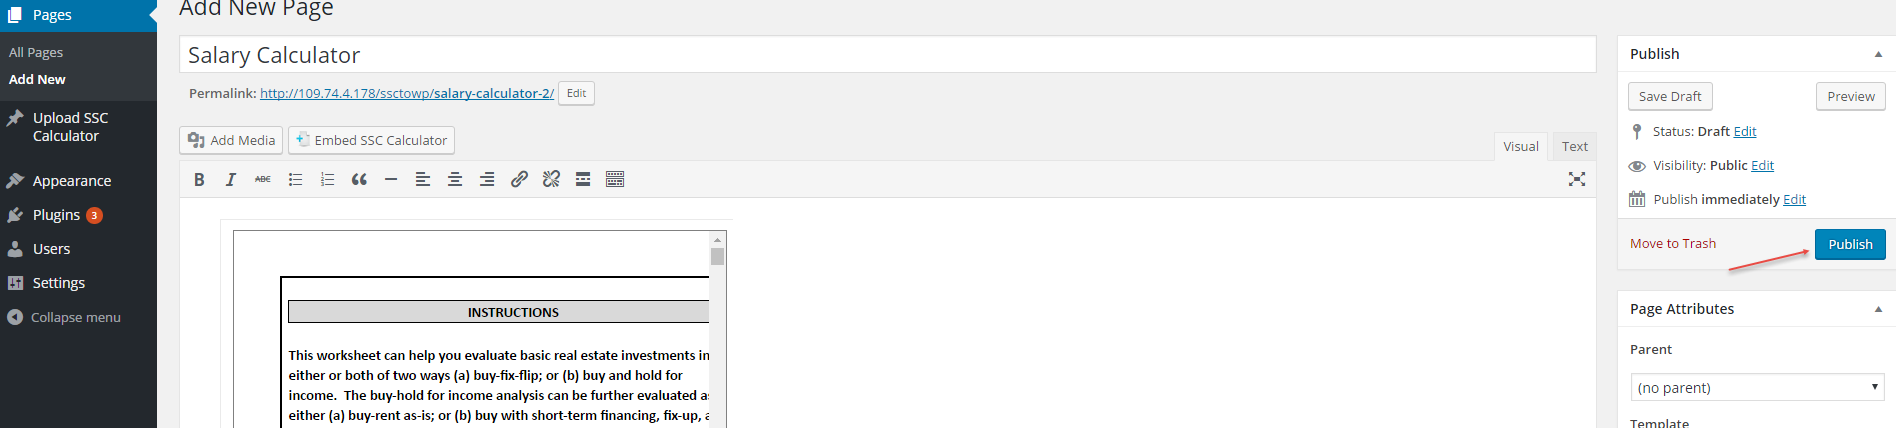
Publish or update the post or page. 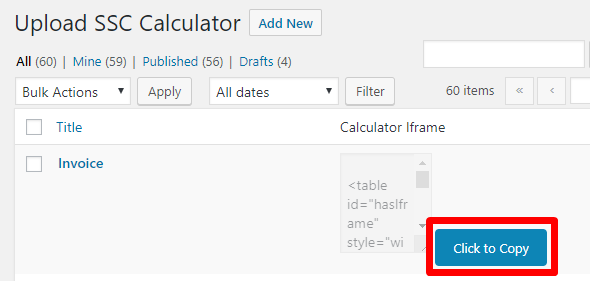
Copy the embed code using the convenient button in the Calculator iframe column. 
Insert a Custom HTML block and use the HTML view when you paste the embed code. 
Adjust the width and height in the embed code. 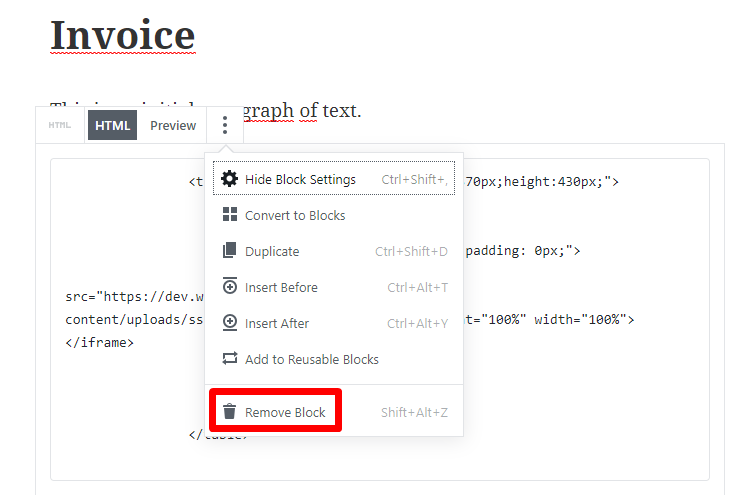
Remove the Custom HTML block using the block menu.
FAQ
-
There is no “Upload SSC Calculator” link in my WordPress.
-
Verify that you have installed the plugin correctly using the instructions on the Installation tab. After a successful installation, there will be an Upload SSC Calculator link in your WordPress menu.
-
I pressed the “Upload SSC Calculator” link but I only get to an empty list.
-
Click on Add New to add a new calculator.
-
I tried to upload a spreadsheet but it says “Please upload ZIP file”.
-
You must first convert your spreadsheet to web format using the SpreadsheetConverter add-in for Microsoft Excel. Then you use the Publish section of the SpreadsheetConverter menu to build an SSC Calculator file that you can upload to WordPress.
-
Where can I find the SpreadsheetConverter add-in for Excel?
-
You can download a free 30-day trial at www.spreadsheetconverter.com.
-
This plugin for WordPress is free, can I also get SpreadsheetConverter for free?
-
No, there is no free version of SpreadsheetConverter. Prices for unlimited, lifetime licenses for the current version start at $254 (there are no extra fees per server, month, page or visitor).
-
I clicked on Choose Package but I don’t know where the SSC Calculator file is.
-
The SSC Calculator file is created after the conversion of the spreadsheet to web format, using the WordPress plugin dialog. By default, it is located in Documents > SpreadsheetConverter. If your calculator is called weekly-time-card.xlsx, there will be a folder called weekly-time-card with your converted calculator. You cannot upload this uncompressed folder, only the specially prepared and compressed SSC Calculator file which is in ZIP format. Scroll down past the folder to the weekly-time-card.zip file, select it and press Open.
-
Sorry, WordPress requires the button to be labeled Publish. Press the Publish button and the SSC Calculator file will be uploaded to WordPress. It will not be visible in any post or page until you embed it.
-
I have uploaded a calculator but it is not visible in the website.
-
After you upload the SSC Calculator file you must embed the calculator into any page or post where you want it to appear. If you use the Block editor, insert a Custom HTML block and paste the HTML from the Calculator iframe column for the uploaded calculator. If you use the Classic editor, place the cursor at the right spot and click Embed SSC Calculator. In the list called Calculator Link, scroll to and select the calculator you want to embed. If necessary, modify the size of the calculator frame in the fields Iframe Width and Iframe Height. Click Insert Calculator.
-
I don’t see the calculator, only an iframe tag.
-
To get a preview of the web page, you must switch to the Preview or Visual view. When you paste the embed code you need to be in the HTML or Text view.
-
I managed to insert a calculator but the frame is too small so parts of the calculator aren’t visible.
-
Switch to the HTML or Text view. Adjust the height and width parameters in the table id=”hasIframe” tag that represents the calculator, switching back and forth to the Preview or Visual view until the calculator looks good. With the Classic editor, you can also use the resize handle at the lower right-hand corner of the calculator. Drag the handle to resize the calculator frame. Don’t be afraid of leaving a considerable margin around your calculator.
-
There is a large black toolbar at the bottom of my calculator. How do I remove it?
-
If you don’t want the calculator to include a toolbar, or if you want to select other buttons for the toolbar, you need to adjust the Workbook settings in SpreadsheetConverter. Uncheck all buttons in the Workbook > Toolbar section and unselect Enable Real-time Sync in Workbook > Web Page Options. Convert the spreadsheet again and update it in WordPress.
-
I want the calculator to appear at the bottom of the page.
-
If you are using the Block editor, move the Custom HTML block to the correct position on the page, either by dragging it or using the up/down arrows. If you are using the Classic editor, switch to the Text tab. Select the entire embed code, from the table id=”hasIframe” statement to the /table statement, and move it to a different location using cut-and-paste.
-
I want to remove a calculator that I previously embedded in “page A”, because I have moved it to “page B”.
-
Edit “page A”. If you are using the Block editor, simply remove the Custom HTML block. If you are using the Classic editor, switch to the Text tab, remove the entire “hasIframe” table, from the table id=”hasIframe” statement to the /table statement.
-
I was editing my page and now the web form no longer appears.
-
You may have deleted the embed code by mistake. HTML code may also disappear when you switch between the Block editor and the Classic editor. Just embed the web form again using the instructions above.
-
I want to use an uploaded calculator on more than one web page, can I do that?
-
Of course! You can embed a calculator on as many posts or pages as you like.
-
I created a web form but it always appears left-adjusted. How can I right-adjust it and place text to the left of the form?
-
You need to create a two-column layout for your page. Search the web for wordpress tutorial two columns to get help on how you create a two-column layout first, then move the embed code to the correct location in your two-column design.
-
I have created a calculator and it works fine in my blog. Since then I have edited the spreadsheet in Excel and converted it again. How do I update all the pages on the website that are using the old version, to use the new version instead?
-
In WordPress, click on Upload SSC Calculator, then All Calculators. Move the mouse cursor over the title of the calculator you want to update, so that its menu links appear. Click on the Edit link. Click Choose Package and select the SSC Calculator ZIP file from the the most recent conversion. Press Publish. The new version is uploaded and automatically used instead of the old one. If you have changed the dimensions of the calculator, you may want to adjust the height and width parameters of the embed code in each page (it is visible and editable on the Text tab) until the calculator looks good. If your WordPress site uses advanced caching, you may have to clear the cache to activate the updated calculator.
-
I uploaded a calculator to WordPress but I won’t be using it. How can I delete it?
-
Click on Upload SSC Calculator, then All Calculators. Move the mouse cursor over the title of the calculator you want to update, so that its menu links appear. Click on the Trash link. If you want to delete two or more calculators, you can also tick the checkbox for all calculators that you want to delete, select Move to Trash in the Bulk Actions menu and press Apply.
-
I deleted a calculator by mistake and now I want it back.
-
This is how you restore it from the Trash: click on Upload SSC Calculator, then All Calculators. Just above the first calculator in the list, you will see links for All, Published, Drafts and Trash. Click on the Trash link. Locate the calculator you want to restore in the list and click on its Restore link. If there is no Trash link, or if your calculator is no longer in the Trash, it is because calculators automatically get deleted by WordPress after 30 days in the Trash. If you still have the SSC Calculator file you can just upload it again.
-
I am creating a blog entry for a presentation I’m going to give. I want to include a simple sign-up list for people that want to participate in my presentation. There are only 20 seats. How do I enable the Real-Time Sync feature so that everybody can see all previously registered participants?
-
Create the sign-up form as a spreadsheet in Excel, with column headings for all the information you need about each participant, e.g. Seat, Name, Department and Phone. Fill twenty rows with the numbers 1-20 in the Seat column. Insert Text widgets in all other cells you wish your participants to enter data into, i.e. the Name, Department and Phone cell for each Seat. Convert the spreadsheet with SpreadsheetConverter, upload the ZIP file to WordPress and embed the sign-up form in your blog post. Before you publish the post, switch to the Text tab and locate the iframe tag that represents the sign-up form. Add ?k=presentation at the end of the iframe’s src parameter. Example: if the link to the sign-up list ends with /sign-up.htm, change it to /sign-up.htm?k=presentation. All visitors now share a common list. As people add their names to the list, everybody can see who else registered for your presentation. This also makes it easy for you to know when the event is fully booked. Read the full tutorial.
-
I have another question that is not answered in this FAQ.
-
A full online help for the plugin is available on the SpreadsheetConverter website. Please send any other questions you have to qa@spreadsheetconverter.com.
Reviews
Contributors and Developers
“Import Spreadsheets from Microsoft Excel” is open source software. The following people have contributed to this plugin.
ContributorsTranslate “Import Spreadsheets from Microsoft Excel” into your language.
Interested in development?
Browse the code, check out the SVN repository, or subscribe to the development log by RSS.
Change Log
10.1.4
- Fixed security vulnerability with shortcode
10.1.3
- Under rare conditions, the Embed Calculator button did not appear in the Classic editor.
10.1.2
- Under very rare circumstances, WordPress would add one or more underscores to the name of a folder for uploaded content. When our code generated links to the folder, these underscores were not included, which caused the links to break.
10.1.1
- $row array issue fixes.
- zip file open/read issue fixed for PHP version 8.
- getting zip file name function changed.
10.1
- Extensive revision of the plugin to support the Gutenberg Block editor in both WordPress version 4 and 5, with seamless switching to/from the Classic editor. Please read the Upgrade Notice for information about a problem that may appear when you switch back and forth between the Block editor and the Classic editor.
10.0.2
- line 396 to 408 : commented sanitization file check because all folder/file are renamed accordingly
- line 451 to 461 : added to rename folder, file and to delete unsanitized filename
- line 609 to 613 : commented message invalid file name
10.0.1
- readme.txt updated with up-to-date information and separate changelog.txt file added
- line 410 : sanitize_file_name() added
- line 409 : replaced mkdir with wp_mkdir_p which is WordPress built-in function.
- line 399 : check if folder name to be created is valid name.
- line 413 : check if target zip file to be processed has valid name.
- error message: Invalid file name. Only characters, numbers, underscore, dot and dashes are allowed.
- Improvement: Implemented all the requirements of the standard WordPress plugin.
- Fix: Tested with the latest WordPress version 4.9