
Description
More than 9 out of 10 users are using a browser that is able to display webp images. Yet, on most websites, they are served jpeg images, which are typically double the size of webp images for a given quality. What a waste of bandwidth! This plugin was created to help remedy that situation. With little effort, WordPress admins can have their site serving autogenerated webp images to browsers that supports it, while still serving jpeg and png files to browsers that does not support webp.
The image converter
The plugin uses the WebP Convert library to convert images to webp. WebP Convert is able to convert images using multiple methods. There are the “local” conversion methods: imagick, cwebp, vips, gd. If none of these works on your host, there are the cloud alternatives: ewww (paid) or connecting to a WordPress site where you got WebP Express installed and you enabled the “web service” functionality.
The “Serving webp to browsers that supports it” part.
The plugin supports different ways of delivering webps to browsers that supports it:
- By routing jpeg/png images to the corresponding webp – or to the image converter if the image hasn’t been converted yet.
- By altering the HTML, replacing image tags with picture tags. Missing webps are auto generated upon visit.
- By altering the HTML, replacing image URLs so all points to webp. The replacements only being made for browsers that supports webp. Again, missing webps are auto generated upon visit.
- In combination with Cache Enabler, the same as above can be achieved, but with page caching.
- You can also deliver webp to all browsers and add the webpjs javascript, which provides webp support for browsers that doesn’t support webp natively. However, beware that the javascript doesn’t support srcset attributes, which is why I haven’t added that method to the plugin (yet).
The plugin implements the “WebP On Demand” solution described here and builds on a bunch of open source libraries (all maintained by me):
– WebP Convert: For converting images to webp
– WebP Convert Cloud Service: For the Web Service functionality
– DOM Util for WebP: For the Alter HTML functionality
– Image MimeType Guesser: For detecting mime types of images.
– HTAccess Capability Tester: For testing .htaccess capabilities in a given directory, using live tests
– WebP Convert File Manager: For browsing conversions and triggering conversions.
– Exec With Fallback: For emulating exec() on systems where it is disabled (using proc_open(), passthru() or similar alternatives).
Benefits
- Much faster load time for images in browsers that supports webp. The converted images are typically less than half the size (for jpeg), while maintaining the same quality. Bear in mind that for most web sites, images are responsible for the largest part of the waiting time.
- Better user experience (whether performance goes from terrible to bad, or from good to impressive, it is a benefit).
- Better ranking in Google searches (performance is taken into account by Google).
- Less bandwidth consumption – makes a huge difference in the parts of the world where the internet is slow and costly (you know, ~80% of the world population lives under these circumstances).
- Currently ~97% of all traffic are done with browsers supporting webp.
- It’s great for the environment too! Reducing network traffic reduces electricity consumption which reduces CO2 emissions.
Limitations
- The plugin should now work on Microsoft IIS server, but it has not been tested thoroughly.
Supporting WebP Express
Bread on the table don’t come for free, even though this plugin does, and always will. I enjoy developing this, and supporting you guys, but I kind of need the bread too. Please make it possible for me to continue wasting time on this plugin:
- Buy me a Coffee
- Buy me coffee on a regular basis and help ensuring my coffee supplies doesn’t run dry.
Supporters of WebP Express
Persons who recently contributed with ko-fi – Thanks!
- 5 Jan: Joel
- 24 Dec: Patrick Müller
- 16 Dec: Dragos
- 9 Aug: Tanzi
- 3 Jul: Jen
- 26 Jun: Per
- 16 May: Erick Danzer
- 8 May: Mike
- 31 May: parallactic
- 14 May: Gitte Rebsdorf
- 9 May: La Braud
Persons who recently contributed on github sponsors – Thanks!
* 16 Dec: kcrlost
* 16 Dec: Yakovos Frountas (Greece)
Persons who contributed with extra generously amounts of coffee / lifetime backing (>80$) – thanks!:
- Patrick Müller ($250)
- Max Kreminsky ($115)
- Justin – BigScoots ($105)
- Bill Vallance ($102)
- Joel ($100)
- Label Vier ($100)
- Sebastian ($99)
- Tammy Lee ($90)
Screenshots
Installation
- Upload the plugin files to the
/wp-content/plugins/webp-expressdirectory, or install the plugin through the WordPress plugins screen directly. - Activate the plugin through the ‘Plugins’ screen in WordPress
- Configure it (the plugin doesn’t do anything until configured)
- Verify that it works
- (Optional) Bulk convert all images, either in the admin ui or using WP CLI (command: “webp-express”)
Configuring
You configure the plugin in Settings > WebP Express.
Operation modes
As sort of a main switch, you can choose between the following modes of operation:
Varied image responses: WebP Express creates redirection rules for images, such that a request for a jpeg will result in a webp – but only if the request comes from a webp-enabled browser. If a webp already exists, it is served immediately. Otherwise it is converted and then served. Note that not all CDN’s handles varied responses well.
CDN friendly: In “CDN friendly” mode, a jpeg is always served as a jpeg. Instead of varying the image response, WebP Express alters the HTML for webp usage.
Just redirect: In “just redirect” mode, WebP Express is used just for redirecting jpeg and pngs to existing webp images in the same folder. So in this mode, WebP express will not do any converting. It may be that you use another plugin for that, or that you converted the images off-line and uploaded them manually.
Tweaked: Here you have all options available.
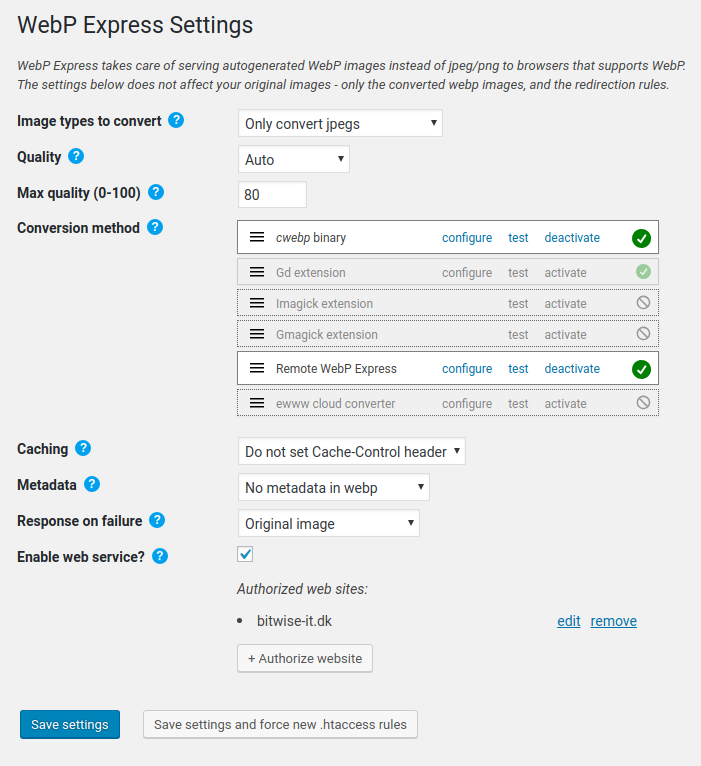
Conversion methods
WebP Express has a bunch of methods available for converting images: Executing cwebp binary, Gd extension, Imagick extension, ewww cloud converter and remote WebP express. Each requires something. In many cases, one of the conversion methods will be available. You can quickly identify which converters are working – there is a green icon next to them. Hovering conversion methods that are not working will show you what is wrong.
In case no conversion methods are working out of the box, you have several options: – You can install this plugin on another website, which supports a local conversion method and connect to that using the “Remote WebP Express” conversion method – You can purchase a key for the ewww cloud converter. They do not charge credits for webp conversions, so all you ever have to pay is the one dollar start-up fee 🙂 – You can set up webp-convert-cloud-service on another server and connect to that. Its open source. – You can try to meet the server requirements of cwebp, gd, imagick or gmagick. Check out this wiki page on how to do that
Quality detection of jpegs
If your server has Imagick extension or is able to execute imagemagick binary, the plugin will be able to detect the quality of a jpeg, and use that quality for the converted webp. You can tell if the quality detection is available by hovering the help icon in Conversion > Jpeg options > Quality for lossy. The last line in that help text tells you.
This auto quality has benefits over fixed quality as it ensures that each conversion are converted with an appropriate quality. Encoding low quality jpegs to high quality webps does not magically increase the visual quality so that your webp looks better than the original. But it does result in a much larger filesize than if the jpeg where converting to a webp with the same quality setting as the original.
If you do not have quality detection working, you can try one of the following: – Install Imagick on the server (for this purpose, it is not required that it is compiled with WebP support) – Install imagemagick on the server and grant permission for PHP to use the “exec” function. – Use “Remote WebP Express” converter to connect to a site, that does have quality detection working – If you have cwebp converter available, you can configure it to aim for a certain reduction, rather than using the quality parameter. Set this to for example 50%, or even 45%.
Verifying that it works (in “Varied image responses” mode)
- Make sure at least one of the conversion methods are working. It should have a green checkmark next to it.
- If you haven’t saved yet, click “Save settings”. This will put redirection rules into .htaccess files in the relevant directories (typically in uploads, themes and wp-content/webp-express/webp-images, depending on the “Scope” setting)
- I assume that you checked at least one of the two first checkboxes in the .htaccess rules section. Otherwise you aren’t using “varied responses”, and then the “CDN friendly” mode will be more appropriate.
- Click the “Live test” buttons to see that the enabled rules actually are working. If they are not, it could be that the server needs a little time to recognize the changed rules.
The live tests are quite thorough and I recommend them over a manual test. However, it doesn’t hurt to do a manual inspection too.
Doing a manual inspection
Note that when WebP Express is serving varied image responses, the image URLs still points to the jpg/png. If the URL is visited using a browser that supports webp, however, the response will be a webp image. So there is a mismatch between the file extension (the filename ends with “jpg” or “png”) and the file type. But luckily, the browser does not rely on the extension to determine the file type, it only looks at the Content-Type response header.
To verify that the plugin is working (without clicking the test button), do the following:
- Open the page in a browser that supports webp, ie Google Chrome
- Right-click the page and choose “Inspect”
- Click the “Network” tab
- Reload the page
- Find a jpeg or png image in the list. In the “type” column, it should say “webp”
You can also look at the headers. When WebP Express has redirected to an existing webp, there will be a “X-WebP-Express” header with the following value: “Redirected directly to existing webp”. If there isn’t (and you have checked “Enable redirection to converter”), you should see a “WebP-Convert-Log” header (WebP-Express uses the WebP Convert for conversions).
Notes
Note: The redirect rules created in .htaccess are pointing to a PHP script. If you happen to change the url path of your plugins, the rules will have to be updated. The .htaccess also passes the path to wp-content (relative to document root) to the script, so the script knows where to find its configuration and where to store converted images. So again, if you move the wp-content folder, or perhaps moves WordPress to a subfolder, the rules will have to be updated. As moving these things around is a rare situation, WebP Express are not using any resources monitoring this. However, it will do the check when you visit the settings page.
Note: Do not simply remove the plugin without deactivating it first. Deactivation takes care of removing the rules in the .htaccess file. With the rules there, but converter gone, your Google Chrome visitors will not see any jpeg images.
Bulk convert
You can start a bulk conversion two ways: 1. In the admin UI. On the settings screen, there is a “Bulk Convert” button 2. By using WP CLI (command: “webp-express”).
I’m currently working on a file manager interface, which will become a third way.
Making sure new images becomes converted
There are several ways:
1. Enable redirection to converter in the .htaccess rules section.
2. Enable “Convert on upload”. Note that this may impact upload experience in themes which defines many formats.
3. Set up a cron job, which executes wp webp-express convert regularily
WP CLI command
WebP Express currently supports commands for converting and flushing webp images throug the CLI. You can use the –help option to learn about the options: wp webp-express –help. Displays the available commands wp webp-express convert –help. Displays the available options for the “convert” command.
A few examples: wp webp-express convert: Creates webp images for all unconverted images wp webp-express convert –reconvert: Also convert images that are already converted wp webp-express convert themes: Only images in the themes folder wp webp-express convert uploads/2021: Only images in the “2021” folder inside the uploads folder wp webp-express convert –only-png: Only the PNG images wp webp-express convert –quality=50: Use quality 50 (instead of what was entered in settings screen) wp webp-express convert –converter=cwebp: Specifically use cwebp converter.
wp webp-express flushwebp: Remove all webp images wp webp-express flushwebp –only-png: Remove all webp images that are conversions of PNG images
Synopsises:
wp webp-express convert [<location>] [--reconvert] [--only-png] [--only-jpeg] [--quality=<number>] [--near-lossless=<number>] [--alpha-quality=<number>] [--encoding=<auto|lossy|lossless>] [--converter=<converter>]
wp webp-express flushwebp [--only-png]
I’m considering adding commands for viewing status, viewing conversion stats, generating the .htaccess files and modifying the settings. Please let me know if you need any of these or perhaps something else.
FAQ
-
How do I verify that the plugin is working?
-
Verifying that the plugin works in “Varied image responses” mode
1. Make sure at least one of the conversion methods are working. It should have a green checkmark next to it.
2. If you haven’t saved yet, click “Save settings”. This will put redirection rules into .htaccess files in the relevant directories (typically in uploads, themes and wp-content/webp-express/webp-images, depending on the “Scope” setting)
3. I assume that you checked at least one of the checkboxes in the .htaccess rules section – otherwise you might as well change to “CDN friendly” mode. The first
4. Click the “Live test” buttons to see that the enabled rules actually are working. If they are not, it could be that the server needs a little time to recognize the changed rules.The live tests are quite thorough and I recommend them over a manual test. However, it doesn’t hurt to do a manual inspection too.
Doing a manual inspection
Note that when WebP Express is serving varied image responses, the image URLs still points to the jpg/png. If the URL is visited using a browser that supports webp, however, the response will be a webp image. So there is a mismatch between the file extension (the filename ends with “jpg” or “png”) and the file type. But luckily, the browser does not rely on the extension to determine the file type, it only looks at the Content-Type response header.
To verify that the plugin is working (without clicking the test button), do the following:
- Open the page in a browser that supports webp, ie Google Chrome
- Right-click the page and choose “Inspect”
- Click the “Network” tab
- Reload the page
- Find a jpeg or png image in the list. In the “type” column, it should say “webp”
You can also look at the headers. When WebP Express has redirected to an existing webp, there will be a “X-WebP-Express” header with the following value: “Redirected directly to existing webp”. If there isn’t (and you have checked “Enable redirection to converter”), you should see a “WebP-Convert-Log” header (WebP-Express uses the WebP Convert for conversions).
-
No conversions methods are working out of the box
-
Don’t fret – you have options!
- If you a controlling another WordPress site (where the local conversion methods DO work), you can set up WebP Express there, and then connect to it by configuring the “Remote WebP Express” conversion method.
- You can also setup the ewww conversion method. To use it, you need to purchase an api key. They do not charge credits for webp conversions, so all you ever have to pay is the one dollar start-up fee 🙂 (unless they change their pricing – I have no control over that). You can buy an api key here: https://ewww.io/plans/
- I have written a template letter which you can send to your webhost
- You can try to get one of the local converters working. Check out this page on the webp-convert wiki. There is also this test/troubleshooting script which is handy when messing around with this.
- Finally, if you have access to another server and are comfortable with installing projects with composer, you can install webp-convert-cloud-service. It’s open source.
Of course, there is also the option of using another plugin altogether. I can recommend Optimole. If you want to try that out and want to support me in the process, follow this link. It is an affiliate link and will give me a reward in case you decide to sign up.
-
It doesn’t work – Although test conversions work, it still serves jpeg images
-
Actually, you might be mistaking, so first, make sure that you didn’t make the very common mistake of thinking that something with the URL example.com/image.jpg must be a jpeg image. The plugin serves webp images on same URL as the original (unconverted) images, so do not let appearances fool you! Confused? See next FAQ item.
Assuming that you have inspected the content type header, and it doesn’t show “image/webp”, please make sure that:
1) You tested with a browser that supports webp (such as Chrome)
2) The image URL you are looking at are not pointing to another server (such as gravatar.com)Assuming that all above is in place, please look at the response headers to see if there is a X-WebP-Convert-Status header. If there isn’t, well, then it seems that the problem is that the image request isn’t handed over to WebP Express. Reasons for that can be:
- You are on NGINX (or an Apache/Nginx combination). NGINX requires special attention, please look at that FAQ item
- You are on WAMP. Please look at that FAQ item
I shall write more on this FAQ item… Stay tuned.
-
How can a webp image be served on an URL ending with “jpg”?
-
Easy enough. Browsers looks at the content type header rather than the URL to determine what it is that it gets. So, although it can be confusing that the resource at example.com/image.jpg is a webp image, rest assured that the browsers are not confused. To determine if the plugin is working, you must therefore examine the content type response header rather than the URL. See the “How do I verify that the plugin is working?” Faq item.
I am btw considering making an option to have the plugin redirect to the webp instead of serving immediately. That would remove the apparent mismatch between file extension and content type header. However, the cost of doing that will be an extra request for each image, which means extra time and worse performance. I believe you’d be ill advised to use that option, so I guess I will not implement it. But perhaps you have good reasons to use it? If you do, please let me know!
-
WP CLI, but how do I use it to bulk convert?
-
Well, first, if you don’t know WP CLI, here is a quick start
WebP Express currently supports commands for converting and flushing webp images throug the CLI. You can use the –help option to learn about the options:
wp webp-express –help. Displays the available commands
wp webp-express convert –help. Displays the available options for the “convert” command.A few examples:
wp webp-express convert: Creates webp images for all unconverted images
wp webp-express convert –reconvert: Also convert images that are already converted
wp webp-express convert themes: Only images in the themes folder
wp webp-express convert uploads/2021: Only images in the “2021” folder inside the uploads folder
wp webp-express convert –only-png: Only the PNG images
wp webp-express convert –quality=50: Use quality 50 (instead of what was entered in settings screen)
wp webp-express convert –quality=50 –near-lossless=50 –alpha-quality=50 –encoding=lossy: More conversion options. encoding can be “lossy”, “lossless” or “auto”
wp webp-express convert –converter=cwebp: Specifically use cwebp converter. Other options: “vips”, “imagemagick”, “ffmpeg”. PS: For “ewww” and “wpc” (remote webp express) does not work here.wp webp-express flushwebp: Remove all webp images
wp webp-express flushwebp –only-png: Remove all webp images that are conversions of PNG imagesSynopsises:
wp webp-express convert [<location>] [--reconvert] [--only-png] [--only-jpeg] [--quality=<number>] [--near-lossless=<number>] [--alpha-quality=<number>] [--encoding=<auto|lossy|lossless>] [--converter=<converter>]
wp webp-express flushwebp [--only-png]
I’m considering adding commands for viewing status, viewing conversion stats, generating the .htaccess files and modifying the settings. Please let me know if you need any of these or perhaps something else.
-
Blank images in Safari?
-
WebP Express has three ways of distributing webp to webp-enabled browsers while still sending the originals to webp-disabled browsers. While method 1 can be combined with any of the other methods, you would usually just pick method 1 or one of the others if method 1 cannot be used for you.
Can some of these go wrong?
Yes. All!Method 1: Varied image responses
The “Varied image responses” method adds rules to the.htaccesswhich redirects jpegs and pngs to the corresponding webps (if they exist). The rules have a condition that makes sure they only trigger for browsers supports webp images (this is established by examining the “accept” header).I the method “varied image responses” because the response on a given image URL varies (the webp is served on the same URL as the jpeg/png).
In the cases where method 1 fails, it is due to systems that cache images by the URL alone. To prevent this from happening, the
.htaccessrules adds aVary:Acceptresponse header. However, most CDNs does not respect that header unless they are configured to do so. Fortunately proxy servers respects it nicely (however often by throwing out the cached image if the accept header doesn’t match)Method 1 can go wrong if:
- You are using a CDN and it hasn’t been set up to handle varied image responses. If this has happened, it is critical that you purge the CDN cache! For information regarding CDN setups, check out the CDN section in this FAQ
- Your server doesn’t support adding response headers in
.htaccess. On Apache, the “mod_headers” module needs to be enabled. Otherwise the all importantVary:Acceptresponse header will not be set on the response. - Your server doesn’t support SetEnv. However, that module is fortunately very common. I have posted a possible solution to make the rules work without SetEnv here.
- You are on Nginx and you haven’t created rules that adds the
Vary:Acceptheader.
I do not believe it can go wrong in other ways. To be certain, please check out this test page. When visiting the test-page with Safari, you should see two images with the “JPG” label over them. When visiting the test-page with a browser that supports webp, you should see two images with the “WEBP” label over them. If you do not see one of these things, please report! (no-one has yet experienced that)
Since WebP Express 0.15.0 you can use the “Live test” button to check that browsers not supporting webp gets the original files and that the Vary:Accept header is returned. Note however that it may not detect CDN caching problems if the CDN doesn’t cache a new image immediately – and across all its nodes.
Method 2: Altering HTML to use picture tags
IMG tags are replaced with PICTURE tags which has two sources. One of them points to the webp and has the “content-type” set to “image/webp”. The other points to the original. The browser will select the webp source if it supports webp and the other source if it doesn’t.Method 2 can go wrong on old browser that doesn’t support the picture tag syntax. However, simply enable the “Dynamically load picturefill.js on older browsers” option, and it will take care of that issue.
Method 3: Altering HTML to point directly to webps in webp enabled browsers
In this solution, the URLs in the HTML are modified for browsers that supports webp. Again, this is determined by examining the “accept” header. So, actually the complete page HTML varies with this method.Method 3 can go wrong if you are using a page caching plugin if that plugin does not create a separate webp cache for webp-enabled browsers. The Cache Enabler plugin handles this. I don’t believe there are other page caching plugins that does. There is a FAQ section in this FAQ describing how to set Cache Enabler up to work in tandem with WebP Express.
Note that Firefox 66+ unfortunately stopped including “image/webp” in the “accept” header it sends when requesting the page. While Firefox 66+ fortunately still includes “image/webp” in its accept header for images. That will however not get it webp images when using method 3.
-
I am on NGINX or OpenResty
-
WebP Express works well on NGINX, however the UI is not streamlined NGINX yet. And of course, NGINX does not process the .htaccess files that WebP Express generates. WebP Express can be used without redirection, as it can alter HTML to use picture tags which links to the webp alternative. See “The simple way” below. Or, you can get your hands dirty and set up redirection in NGINX guided by the “The advanced way” section below.
The simple way (no redirecting rules)
The easy solution is simply to use the plugin in “CDN friendly” mode, do a bulk conversion (takes care of converting existing images), activate the “Convert on upload” option (takes care of converting new images in the media library) and enable Alter HTML (takes care of delivering webp to webp enabled browsers while still delivering the original jpeg/png to browsers not supporting webp).PRO: Very easy to set up.
CON: Images in external CSS and images being dynamically added with javascript will not be served as webp.
CON: New new theme images will not be converted until you run a new Bulk conversionThe advanced way (creating NGINX redirecting rules)
Creating NGINX rules requires manually inserting redirection rules in the NGINX configuration file (nginx.conf or the configuration file for the site, found in/etc/nginx/sites-available). If you do not have access to do that, you will have to settle with the “simple way” described above.There are two different approaches to achieve the redirections. The one that I recommend is based on a try_files directive. If that doesn’t work for you, you can try the alternative rules that are based on the rewrite directive. The rules are described in the next couple of sections.
For multisite on NGINX, read here
Recommended rules (using “try_files”)
Preparational step:
The rules looks for existing webp files by appending “.webp” to the URL. So for this to work, you must configure WebP Express to store the converted files like that by setting General > File extension to Append “.webp”Preparational step 2:
From 0.25.10 and up, the configuration file has been renamed so the filename contains a “hash” of random characters (a security meassure).
You will have to find the hash by inspecting the filename of the config file.
Look in the /wp-content/webp-express/config folder for a file called something like “config.c513fe386c6b8793f9bf9ad1071d2266.json”.
The string of random characters between “config.” and “.json” is what we here call the “hash”.
You will need to use that string of characters instead of “[your-hash-here]” in the rules suggested below.The rules:
Insert the following in theservercontext of your configuration file (usually found in/etc/nginx/sites-available). “Theservercontext” refers to the part of the configuration that starts with “server {” and ends with the matching “}”.# WebP Express rules # -------------------- location ~* ^/?wp-content/.*\.(png|jpe?g)$ { add_header Vary Accept; expires 365d; if ($http_accept !~* "webp"){ break; } try_files /wp-content/webp-express/webp-images/doc-root/$uri.webp $uri.webp /wp-content/plugins/webp-express/wod/webp-on-demand.php?xsource=x$request_filename&wp-content=wp-content&hash=[your-hash-here] ; } # Route requests for non-existing webps to the converter location ~* ^/?wp-content/.*\.(png|jpe?g)\.webp$ { try_files $uri /wp-content/plugins/webp-express/wod/webp-realizer.php?xdestination=x$request_filename&wp-content=wp-content&hash=[your-hash-here] ; } # ------------------- (WebP Express rules ends here)BEWARE:
– Beware that when copy/pasting you might get html-encoded characters. Verify that the ampersand before “wp-content” isn’t encoded (in the last line in the try_files block)-
Beware that the rules looks for existing webp files by appending “.webp” to the URL. So for this to work, you must configure WebP Express to store the converted files like that.
-
Beware that if you haven’t enabled png conversion, you should replace “(png|jpe?g)” with “jpe?g”.
-
Beware that if you have moved wp-content to a non-standard place, you must change accordingly. Note that you must then also change the “wp-content” parameter to the script. It expects a relative path to wp-content (from document root) and is needed so the script can find the configuration file.
-
Beware that there is a hack out there for permalinks which is based on “rewrite” (rather than the usual solution which is based on try_files). If you are using that hack to redirect missing files to index.php, you need to modify it as specified here
-
I have put in an expires statement for caching. You might want to modify or disable that.
-
The rules contains all redirections (as if you enabled all three redirection options in settings). If you do not wish to redirect to converter, remove the last line in the try_files block. If you do not wish to create webp files upon request, remove the last location block.
-
If you have configured WebP Express to store images in separate folder, you do not need the “$uri.webp” line in the first “try_files” block. But it doesn’t hurt to have it. And beware that the reverse is not true. If configured to store images in the same folder (“mingled”), you still need the line that looks for a webp in the separate folder. The reason for this is that the “mingled” only applies to the images in the upload folder – other images – such as theme images are always stored in a separate folder.
If you cannot get this to work then perhaps you need to add the following to your mime.types configuration file:
image/webp webp;If you still cannot get it to work, you can instead try the alternative rules below.
Credits: These rules are builds upon Eugene Lazutkins solution.
Alternative rules (using “rewrite”)
In case the recommended rules does not work for you, you can try these alternative rules.
The reason I recommend the try_files approach above over these alternative rules is that it is a bit simpler and it is supposed to perform marginally better. These alternative rules are in no way inferior to the other. Choose whatever works!
Preparational step:
The rules looks for existing webp files by appending “.webp” to the URL. So for this to work, you must configure WebP Express to store the converted files like that by setting General > File extension to Append “.webp”. Also make sure that WebP Express is configured with “Destination” set to “Mingled”.The rules:
Insert the following in theservercontext of your configuration file (usually found in/etc/nginx/sites-available). “Theservercontext” refers to the part of the configuration that starts with “server {” and ends with the matching “}”.# WebP Express rules # -------------------- location ~* ^/wp-content/.*\.(png|jpe?g)$ { add_header Vary Accept; expires 365d; } location ~* ^/wp-content/.*\.webp$ { expires 365d; if ($whattodo = AB) { add_header Vary Accept; } } if ($http_accept ~* "webp"){ set $whattodo A; } if (-f $request_filename.webp) { set $whattodo "${whattodo}B"; } if ($whattodo = AB) { rewrite ^(.*) $1.webp last; } if ($whattodo = A) { rewrite ^/wp-content/.*\.(jpe?g|png)$ /wp-content/plugins/webp-express/wod/webp-on-demand.php?xsource=x$request_filename&wp-content=wp-content&hash=[your-hash-here] break; } # ------------------- (WebP Express rules ends here)“
BEWARE:
-
Beware that when copy/pasting you might get html-encoded characters. Verify that the ampersand before “wp-content” isn’t encoded (in the last line in the try_files block)
-
Beware that the rules looks for existing webp files by appending “.webp” to the URL. So for this to work, you must configure WebP Express to store the converted files like that.
-
Beware that if you haven’t enabled png conversion, you should replace “(png|jpe?g)” with “jpe?g”.
-
Beware that if you have moved wp-content to a non-standard place, you must change accordingly. Note that you must then also change the “wp-content” parameter to the script. It expects a relative path to wp-content (from document root) and is needed so the script can find the configuration file.
-
Beware that there is a hack out there for permalinks which is based on “rewrite” (rather than the usual solution which is based on try_files). If you are using that hack to redirect missing files to index.php, you need to modify it as specified here
-
I have put in an expires statement for caching. You might want to modify or disable that.
-
I have not set any expire on the webp-on-demand.php request. This is not needed, as the script sets this according to what you set up in WebP Express settings. Also, trying to do it would require a new location block matching webp-on-demand.php, but that would override the location block handling php files, and thus break the functionality.
-
There is no longer any reason to add “&$args” to the line begining with “/wp-content”. It was there to enable debugging a single image by appending “?debug” to the url. I however removed that functionality from
webp-on-demand.php.
It is possible to put this stuff inside a
locationdirective. However, havingifdirectives insidelocationdirectives is considered evil. But it seems that in our case, it works. If you wish to do that, use the following rules instead:# WebP Express rules # -------------------- location ~* ^/wp-content/.*\.(png|jpe?g)$ { add_header Vary Accept; expires 365d; if ($http_accept ~* "webp"){ set $whattodo A; } if (-f $request_filename.webp) { set $whattodo "${whattodo}B"; } if ($whattodo = AB) { rewrite ^(.*) $1.webp last; } if ($whattodo = A) { rewrite ^/wp-content/.*\.(jpe?g|png)$ /wp-content/plugins/webp-express/wod/webp-on-demand.php?xsource=x$request_filename&wp-content=wp-content&hash=[your-hash-here] last; } } location ~* ^/wp-content/.*\.webp$ { expires 365d; if ($whattodo = AB) { add_header Vary Accept; } } # ------------------- (WebP Express rules ends here)PS: In case you only want to redirect images to the script (and not to existing), the rules becomes much simpler:
# WebP Express rules
# --------------------
if ($http_accept ~* "webp"){
  rewrite ^/(.*).(jpe?g|png)$ /wp-content/plugins/webp-express/wod/webp-on-demand.php?xsource=x$request_filename&wp-content=wp-content&hash=[your-hash-here] break;
}
# ------------------- (WebP Express rules ends here)
Discussion on this topic here
And here: https://github.com/rosell-dk/webp-express/issues/166Here are rules if you need to replace the file extension with “.webp” rather than appending “.webp” to it: https://www.keycdn.com/support/optimus/configuration-to-deliver-webp
-
-
Important: WebP On Demand on NGINX now requires a hash parameter
-
Recent versions of WebP Express (0.25.10 and up) require an instance-specific hash parameter
when using WebP On Demand.` -
I am on a Windows server
-
Good news! It should work now, thanks to a guy that calls himself lwxbr. At least on XAMPP 7.3.1, Windows 10. https://github.com/rosell-dk/webp-express/pull/213.
-
I am on a Litespeed server
-
You do not have to do anything special for it to work on a Litespeed server. You should be able to use WebP Express in any operation mode. For best performance, I however recommend that use the LiteSpeed Cache plugin for page caching.
LiteSpeed Cache can be set up to maintain separate page caches for browsers that supports webp and browsers that don’t. Through this functionality it is possible to use “Alter HTML” with the option “Replace image URLs” and “Only do the replacements in webp enabled browsers” mode.
The setup was kindly shared and explained in detail by @ribeiroeder here
-
I am using Jetpack
-
If you install Jetpack and enable the “Speed up image load times” then Jetpack will alter the HTML such that images are pointed to their CDN.
Ie:
becomes:
Jetpack automatically serves webp files to browsers that supports it using same mechanism as the standard WebP Express configuration: If the “Accept” header contains “image/webp”, a webp is served (keeping original file extension, but setting the “content-type” header to “image/webp”), otherwise a jpg is served.
As images are no longer pointed to your original server, the .htaccess rules created by WebP Express will not have any effect.
So if you are using Jetpack you don’t really need WebP Express?
Well, there is no point in having the “Speed up image load times” enabled together with WebP Express.But there is a case for using WebP Express rather than Jetpacks “Speed up image load times” feature:
Jetpack has the same drawback as the standard WebP Express configuration: If a user downloads the file, there will be a mismatch between the file extension and the image type (the file is ie called “logo.jpg”, but it is really a webp image). I don’t think that is a big issue, but for those who do, WebP Express might still be for you, even though you have Jetpack. And that is because WebP Express can be set up just to generate webp’s, without doing the internal redirection to webp (will be possible from version 0.10.0). You can then for example use the Cache Enabler plugin, which is able to generate and cache two versions of each page. One for browsers that accepts webp and one for those that don’t. In the HTML for webp-enabled browsers, the images points directly to the webp files.
Pro Jetpack:
– It is a free CDN which serves webp out of the box.
– It optimizes jpegs and pngs as well (but note that only about 1 out of 5 users gets these, as webp is widely supported now)Con Jetpack:
– It is a big plugin to install if you are only after the CDN
– It requires that you create an account on WordPress.comPro WebP Express:
– You have control over quality and metadata
– It is a small plugin and care has been taken to add only very little overhead
– Plays well together with Cache Enabler. By not redirecting jpg to webp, there is no need to do any special configuration on the CDN and no issue with misleading file extension, if user downloads a file.Con WebP Express:
– If you are using a CDN and you are redirecting jpg to webp, you must configure the CDN to forward the Accept header. It is not possible on all CDNs. -
Why do I not see the option to set WebP quality to auto?
-
The option will only display, if your system is able to detect jpeg qualities. To make your server capable to do that, install Imagick extension (PECL >= 2.2.2) or enable exec() calls and install either Imagick or Gmagick.
If you have the Imagick, the Imagick binary or the Remote WebP Express conversion method working, but don’t have the global “auto” option, you will have the auto option available in options of the individual converter.
Note: If you experience that the general auto option doesn’t show, even though the above-mentioned requirements should be in order, check out this support-thread.
-
How do I configure my CDN in “Varied image responses” operation mode?
-
In Varied image responses operation mode, the image responses varies depending on whether the browser supports webp or not (which browsers signals in the Accept header). Some CDN’s support this out of the box, others requires some configuration and others doesn’t support it at all.
For a CDN to cooperate, it needs to
1) forward the Accept header and
2) Honour the Vary:Accept response header.You can also make it “work” on some CDN’s by bypassing cache for images. But I rather suggest that you try out the CDN friendly mode (see next FAQ item)
Status of some CDN’s:
- KeyCDN: Does not support varied image responses. I have added a feature request here. You can give it a +1 if you like!
- Cloudflare: See the “I am on Cloudflare” section
- Cloudfront: Works, but needs to be configured to forward the accept header. Go to Distribution settings, find the Behavior tab, select the Behavior and click the Edit button. Choose Whitelist from Forward Headers and then add the “Accept” header to the whitelist.
I shall add more to the list. You are welcome to help out here.
-
How do I make it work with CDN? (“CDN friendly” mode)
-
In CDN friendly mode, there is no trickery with varied image responses, so no special attention is required on the CDN.
However, there are other pitfalls.
The thing is that, unless you have the whole site on a CDN, you are probably using a plugin that alters the HTML in order to point your static assets to the CDN. If you have enabled the “Alter HTML” in WebP Express, it means that you now have two alterations on the image URLs!
How will that play out?
Well, if WebP Express gets to alter the HTML after the image URLs have been altered to point to a CDN, we have trouble. WebP Express does not alter external images but the URLs are now external.
However, if WebP Express gets to alter the HTML before the other plugin, things will work fine.
So it is important that WebP Express gets there first.
The good news is that WebP Express does get there first on all the plugins I have tested.
But what can you do if it doesn’t?
Firstly, you have an option in WebP Express to select between:
1. Use content filtering hooks (the_content, the_excerpt, etc)
2. The complete page (using output buffering)The content filtering hooks gets to process the content before output buffering does. So in case output buffering isn’t early enough for you, choose the content filtering hooks.
There is a risk that you CDN plugin also uses content filtering hooks. I haven’t encountered any though. But if there is any out there that does, chances are that they get to process the content before WebP Express, because I have set the priority of these hooks quite high (10000). The reasoning behind this is to that we want to replace images that might be inserted using the same hook (for example, a theme might use the_content filter to insert the featured image). If you do encounter a plugin for changing URLs for CDN which uses the content filtering hooks, you are currently out of luck. Let me know, so I can fix that (ie. by making the priority configurable)
Here are a list of some plugins for CDN and when they process the HTML:
Plugin
Method
Hook(s)
PriorityBunnyCDN
Output buffering
template_redirect
default (10)CDN enabler
Output buffering
template_redirect
default (10)Jetpack
content filtering
the_content, etc
the_content: 10W3 Total Cache
Output buffering
no hooks. Buffering is started before hooksWP Fastest Cache
Output buffering
no hooks. Buffering is started before hooksWP Super Cache
Output buffering
init
default (10)With output buffering the plugin that starts the output buffering first gets to process the output last. So WebP Express starts as late as possible, which is on …
Reviews
Contributors and Developers
“WebP Express” is open source software. The following people have contributed to this plugin.
Contributors“WebP Express” has been translated into 26 locales. Thank you to the translators for their contributions.
Translate “WebP Express” into your language.
Interested in development?
Browse the code, check out the SVN repository, or subscribe to the development log by RSS.
Change Log
0.25.15
(released 19 May 2026)
* Fixed medium security problem with the WPC converter and got rid of some deprecated warnings on newer PHP versions (thanks to hostep from Belgium, dmitryuk from Kazakhstan and AH72KING from Pakistan for those contributions to the webp-convert library)
0.25.14
(released 25 December 2025)
* Fixed issue that the delete images feature also deleted webp-images that was uploaded as such, when webp-express was configured to store converted images in same folder as originals (not the default option). Also fixed conversion triggered by redirection, which broke on a few systems in a recent update, causing images in the media library not to appear. It may however still be a problem on a very few systems. In that case: Simply disable “Enable redirection to converter” and “Create webp files upon request” and submit an issue.
0.25.13
(released 25 December 2025)
* It is no longer a requirement on Nginx to modify redirection rules by adding a “hash” parameter. This was briefly required in 0.25.10-12. Btw, thanks Patrick Müller, for an extraordinary large donation on Christmas Eve – on top of the recent security fix that he originated. When I see engagement like that, it makes it meaningful for me to prioritize this project
0.25.12
(released 22 December 2025)
* Added notification for users on Nginx which uses redirect rules to change their rewrite rules manually. They must now pass a “hash” parameter in the querystring to the WebP conversion script. Thanks to Luka Paunović for bringing the issue to my attention and updating the README.
0.25.11
(released 22 December 2025)
* Fixes .htaccess rules for redirecting to converter. The bug was introduced in 0.25.10. It caused the conversion not to work on some systems. Thanks to Jon Wallace for reporting the issue on github and assisting in the debugging.
(released 15 December 2025)
* Security fix: Config file was exposed on systems running on NGINX. Herr Patrick Müller from Switzerland for creating a patch as well as Rune Philosof from Denmark for improving it. Some credit also goes to myself for perfecting the patch. Sorry for slacking on the maintenance. There are good reasons for this, but I can and will do better in the future
0.25.9
(released 7 April 2024)
* Bugfix: Fixed ewww conversion method after ewww API change
0.25.8
(released 20 October 2023)
* Bugfix: Depreciation warning on PHP 8.2 with Alter HTML. Thanks to @igamingsolustions for reporting the bug
0.25.7
(released 19 October 2023)
* Bugfix: Removed depreciation warning on settings screen, which was showing in PHP 8.2. Thanks to Rob Meijerink from the Netherlands for providing the fix in a pull request
* Bugfix: Removed depreciation warning when converting, happening in PHP 8.2. Thanks to Sophie B for reporting and Rob Meijerink from the Netherlands for providing the fix in a pull request
* Bugfix: One of the Mime fallback methods did not work. Thanks to gerasart from Ukraine for providing the fix in a pull request
0.25.6
(released 15 April 2023)
* Bugfix: A bug in another plugin can cause delete file hook to be called with an empty string, which WebP Express was not prepared for (fatal exception). Thanks to Colin Frick from Liechtenstein for providing the fix in a pull request on github
* Bugfix: Bug when testing imagick converter from settings page (only PHP 8). Thanks to Sisir from Bangladesh for reporting and providing the fix in a pull request
0.25.5
(released 23 May 2022)
* When using the “Prevent using webps larger than original” with Alter HTML (picture tags) on images with srcset, those webps that where larger than the originals was picked out from the srcset for the webp. This could lead to bad quality images. In the fix, the image will only have a webp source alternative when ALL the webps are smaller than their originals (when the “prevent…” option is set).
* Bugfix: In rare cases, WebP Express could fail detecting mime type
0.25.4
(released 6 May 2022)
* AlterHTML (when using picture tags): Fixed charset problems for special characters in alt and title attributes. The bug was introduced in 0.25.2. Thanks to Cruglk for first pointing this out.
0.25.3
(released 4 May 2022)
* AlterHTML: Fixed BIG BUG introduced in 0.25.2 (the webp urls was wrong when using picture tags). So sorry! Thankfully, I was quickly made aware of this and quickly patched it.
0.25.2
(released 4 May 2022)
* AlterHTML did not skip existing picture tags when they contained newlines, resulting in picture tags inside picture tags, which is invalid markup. Thanks to Jonas for being very helpful in solving this.
0.25.1
(released 7 dec 2021)
* An innocent text file triggered Windows Defender. It has been removed. Thanks to Javad Naroogheh from Iran for notifying
0.25.0
(released 7 dec 2021, on my daughters 10 year birthday!)
* No exec()? – We don’t give up easily, but now emulates it if possible, using proc_open(), passthru() or other alternatives. The result is that the cwebp converter now is available on more systems. Quality detection of jpegs also works on more systems now. The fallback feature with the emulations is btw implemented in a new library, exec-with-fallback
* Bugfix: Our WP CLI command “webp-express” has a quality option, but it was not working
For older releases, check out changelog.txt